
Sync Setup - REAPER on the same computer
About DAW Sync
To play video in sync with REAPER, Video Sync needs a way to follow the REAPER transport - knowing when it plays, stops, and where the playhead is located at any moment. This connection between Video Sync and REAPER is called DAW sync.
About This Configuration
This chapter covers setting up REAPER on the same computer as Video Sync using virtual MIDI ports for MTC (MIDI Timecode) and MMC (MIDI Machine Control) synchronization, including the setup of the MMC Locate plugin.
Note: The following explanation and screenshots are related to REAPER version 6.73, but the steps will be similar for other versions.
Understanding MTC and MMC
This chapter covers setting up two MIDI-based protocols that work together to provide synchronised playback:
MTC (MIDI Timecode) transmits a continuous stream of timecode on a dedicated MIDI port during playback, allowing Video Sync to track the current position and play at the correct speed.
MMC (MIDI Machine Control) sends transport commands and locate messages on a separate dedicated MIDI port. When navigating to a specific timecode position in REAPER (such as clicking in the timeline or using markers), MMC sends locate commands to update Video Sync's position without requiring playback.
Setup
Video Sync features virtual MIDI ports, which mostly removes the need to create network MIDI sessions in Audio MIDI Setup in order to connect to REAPER on the same computer. When Video Sync is launched, it will create virtual MIDI ports named Video Sync MTC In, Video Sync MMC In & Video Sync Trigger In - which will automatically be pre-selected in Video Sync, & visible in REAPER.
For this reason, it is advised to always launch Video Sync before launching REAPER. Failure to do so, may cause some of these settings to be reset to default - such that they need to be re-configured in REAPER again.
Note: If REAPER does not reconnect to the virtual ports automatically when Video Sync is opened after REAPER, it may be better to consider setting up ports via Audio MIDI Setup on the same computer.
Video Sync MTC / MMC Setup
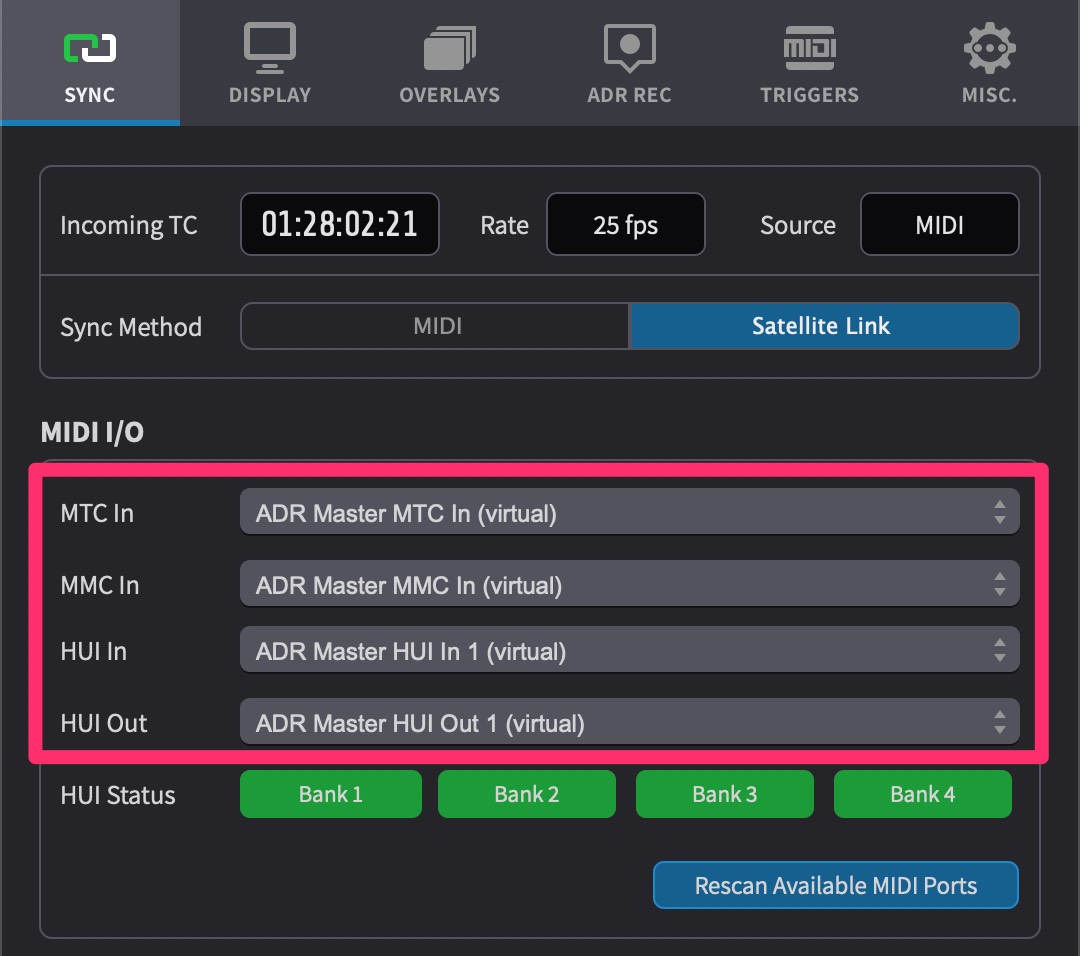
To show the MIDI I/O options in Video Sync, first navigate to the SYNC tab of the Preferences / Settings window.
Set the Sync Source field to Other.
Next, make sure that all the ports are set to their default values Video Sync MTC In (virtual) & Video Sync MMC In (virtual) as per the image below:
REAPER MTC (MIDI Timecode) Setup
To enable MIDI Timecode to be sent to Video Sync, open the REAPER Preferences window by clicking on the REAPER menu & selecting Preferences....
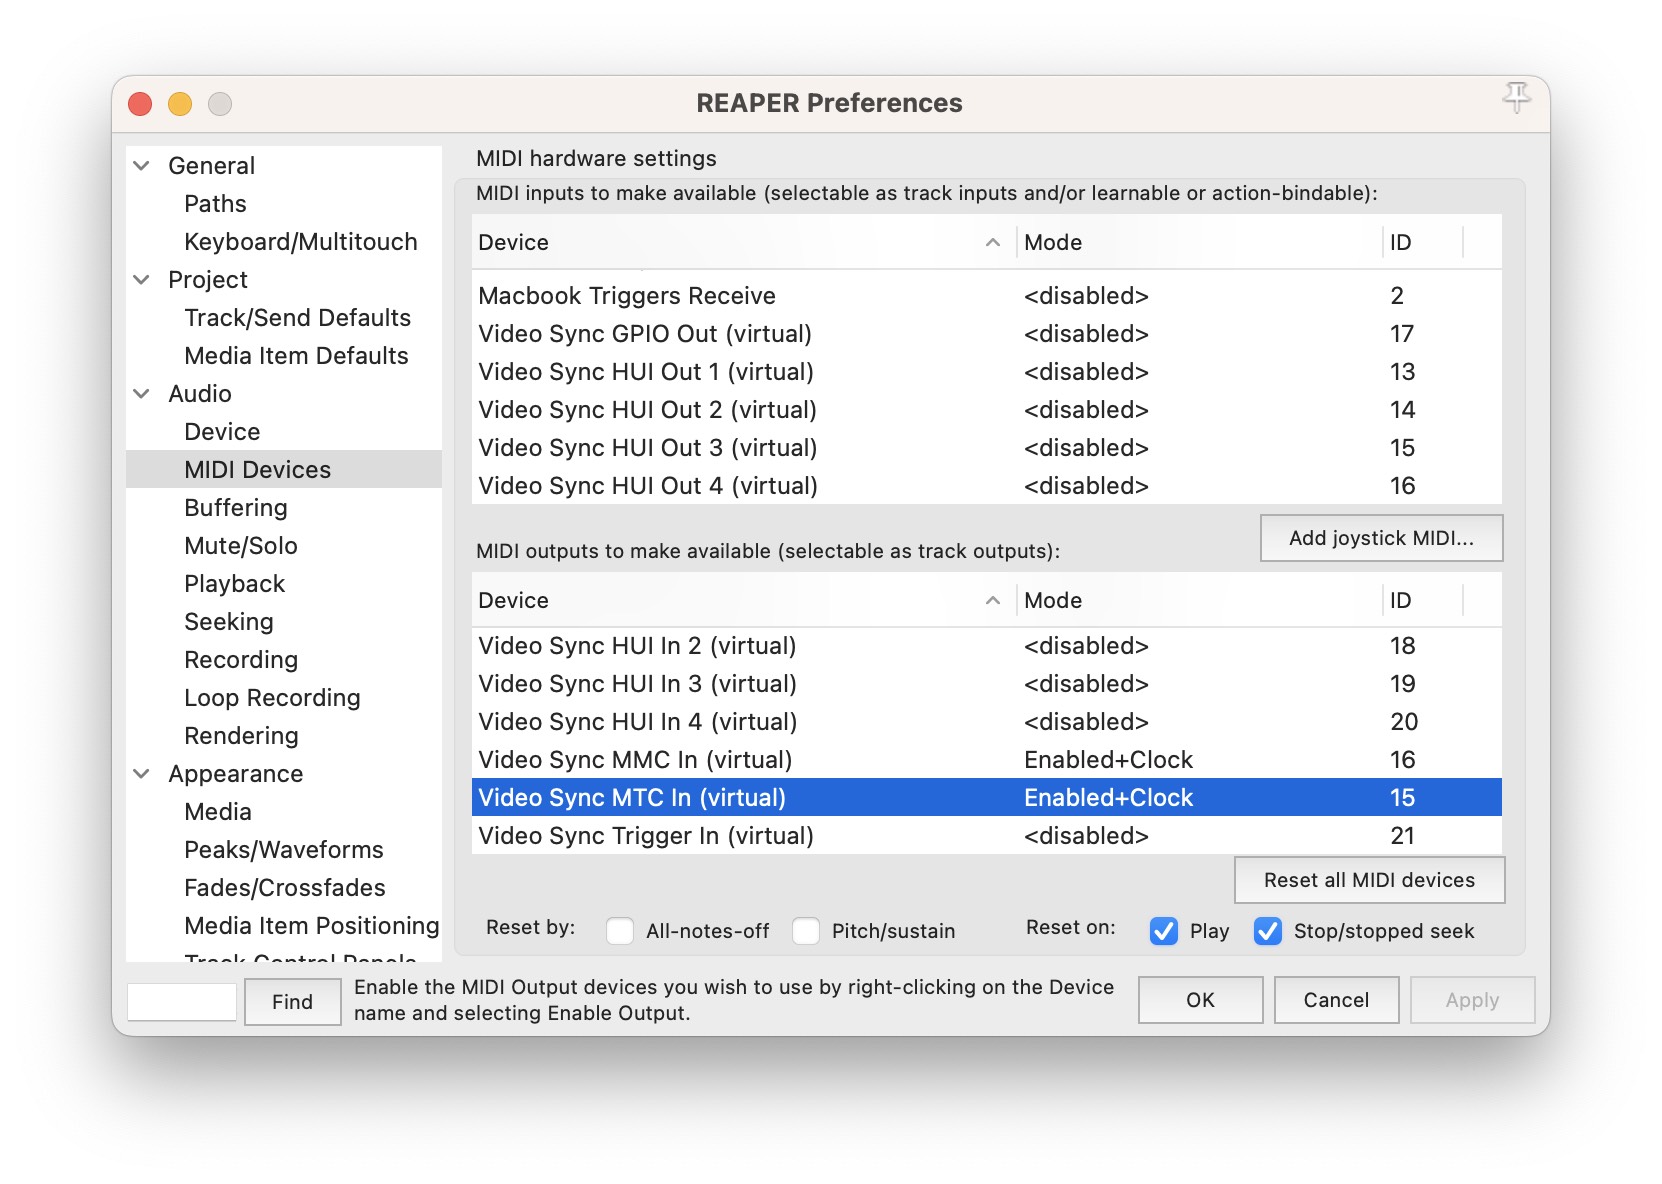
From the Audio sub-category list on the left, click on MIDI Devices.
Locate & double-click the Video Sync MTC In (virtual) entry in the MIDI outputs to make available list.
In the Configure MIDI Output window that appears, activate both Enable output to this device & Send clock to this device by clicking the tick boxes to the left of these options so that they turn blue.
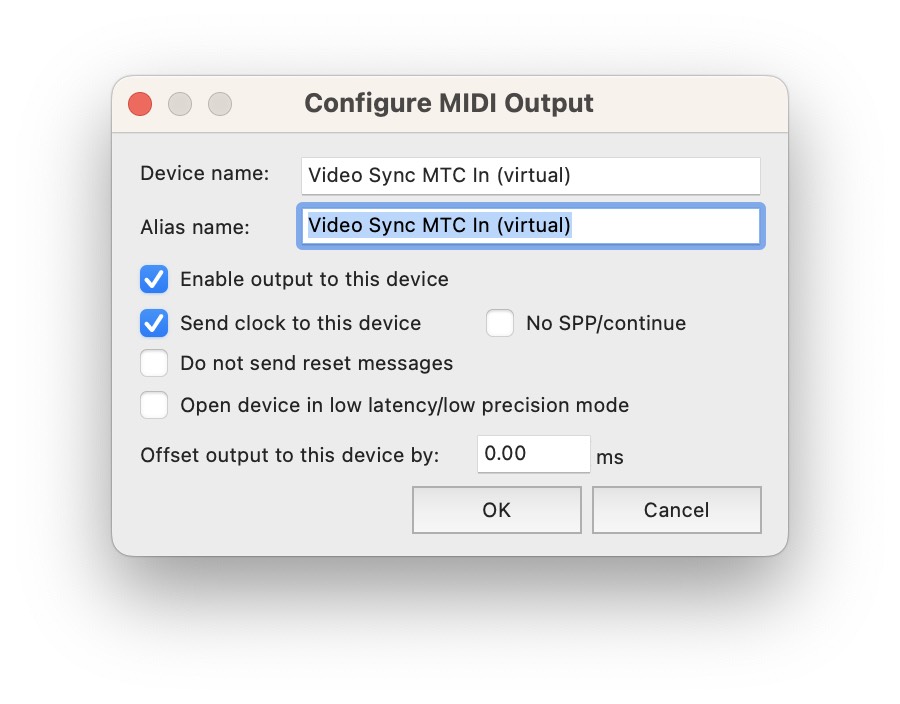
Click on the OK button to close the Configure MIDI Output window.
The Video Sync MTC In (virtual) entry in the MIDI outputs to make available list should now be showing as Enabled & Clock in the Mode column.
Click on the Apply button then the OK button to close the REAPER Preferences window.
Create a new track by clicking in the dark grey area to the left under the last track in the session.
If desired, rename the track something like MTC / MMC.
Rewind the Timeline to the start of the Project.
From the Insert menu, select SMPTE LTC/MTC Timecode Generator.
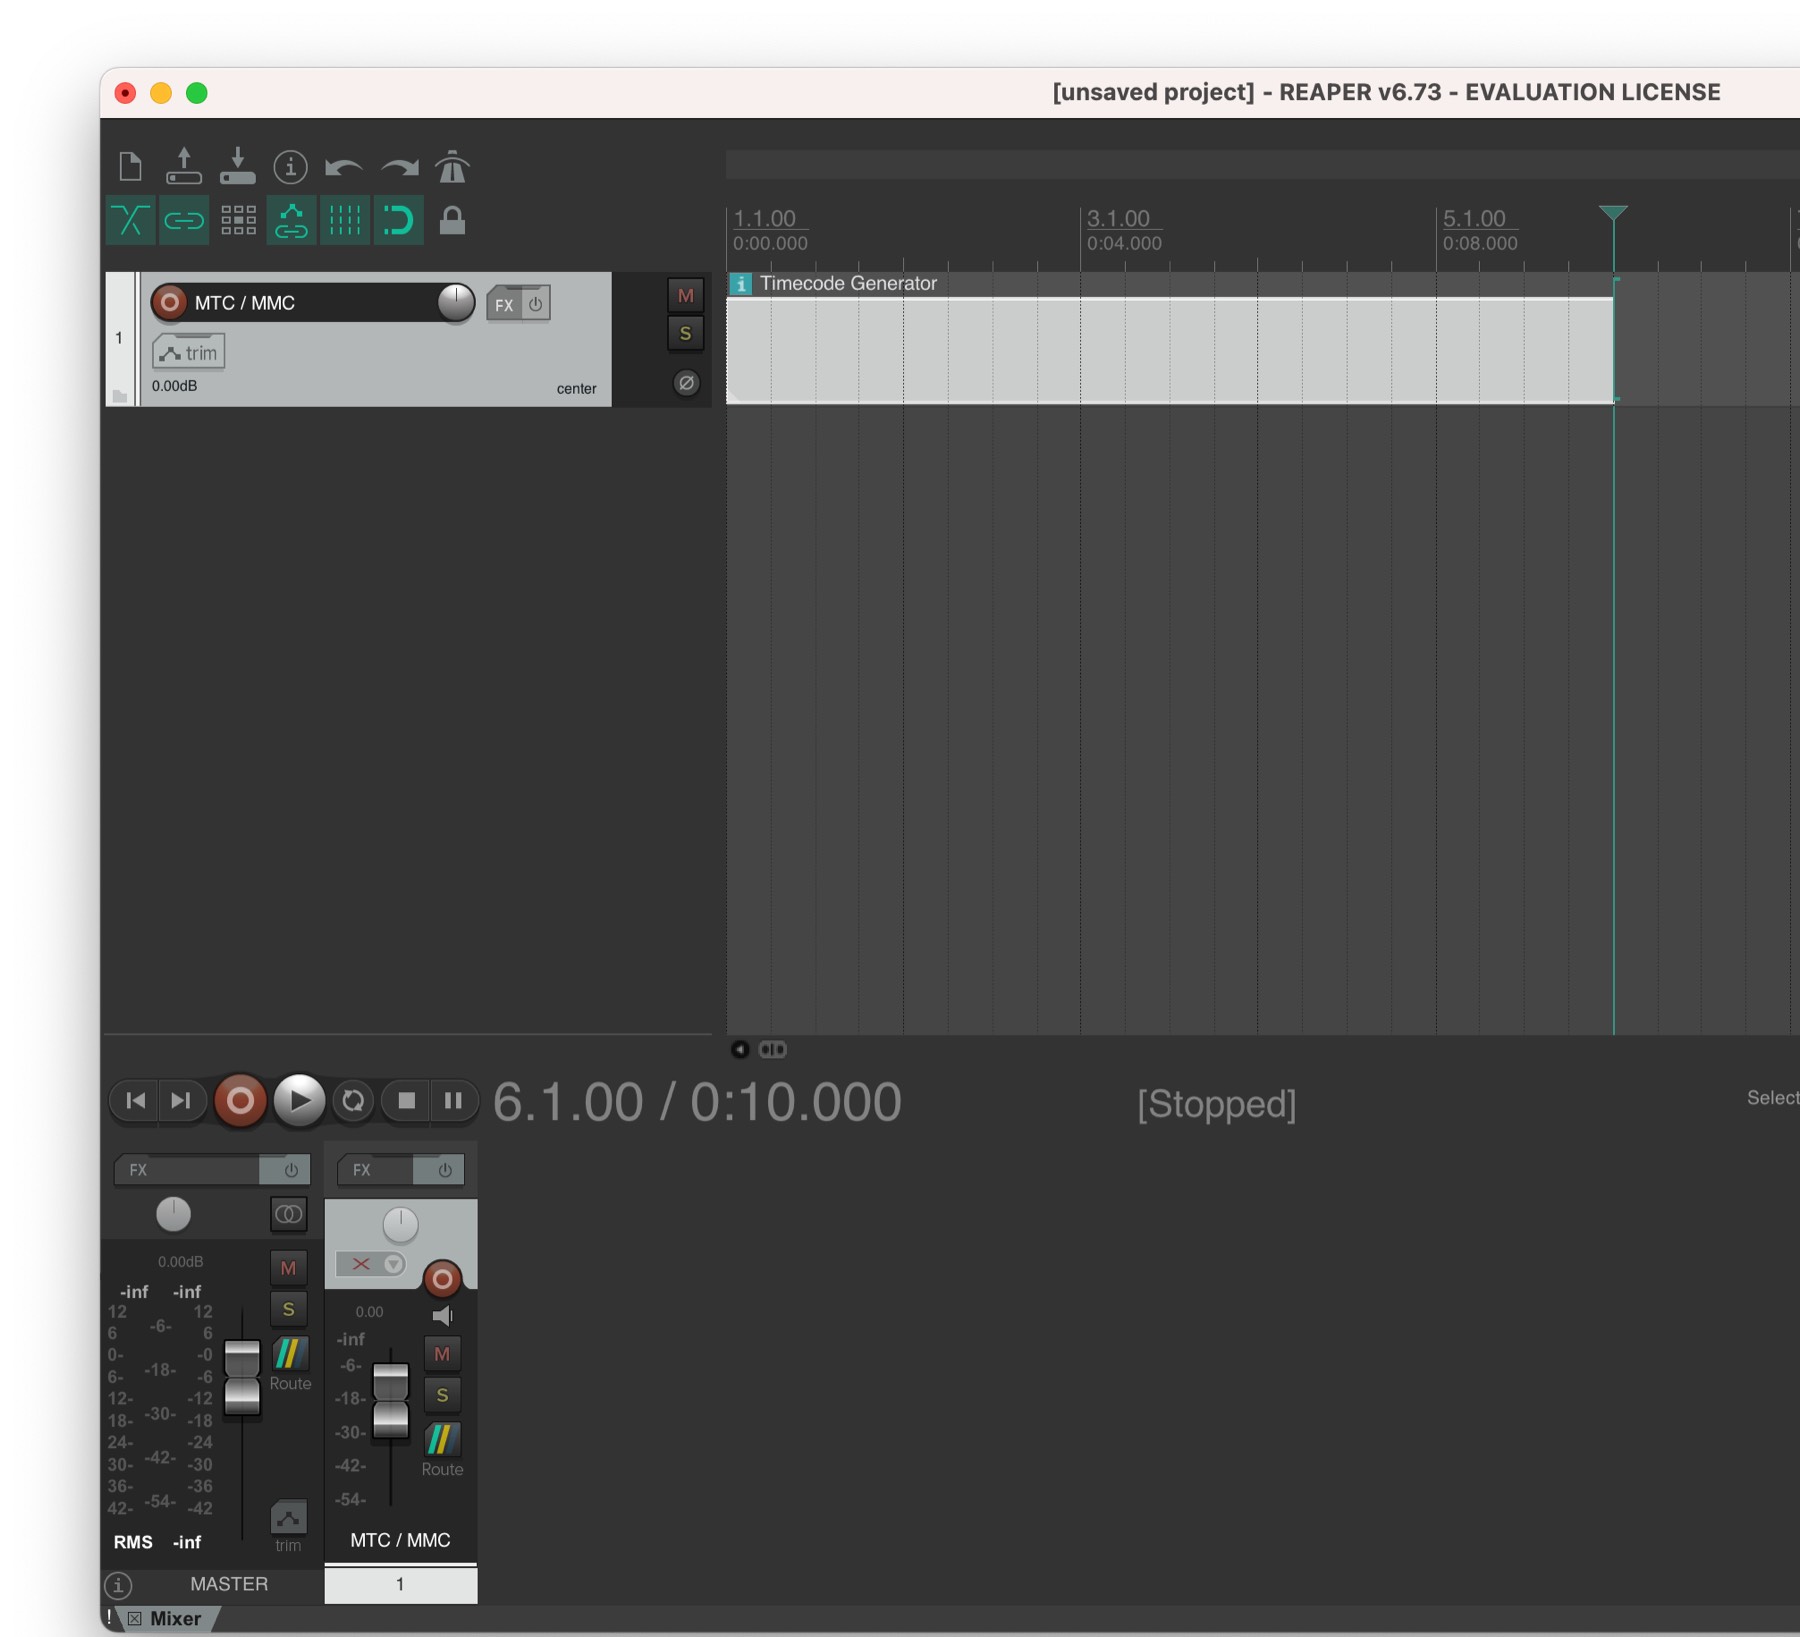
Double-click the white region that appears on the track at that location to bring up the Media Item Properties: Timecode Generator window.
Enable the box called HMSF in the top left of the window.
In the Position field, confirm that this is set to the start of the Timeline in REAPER.
In the Length field, select a duration for the timecode that runs as long as required for your video.
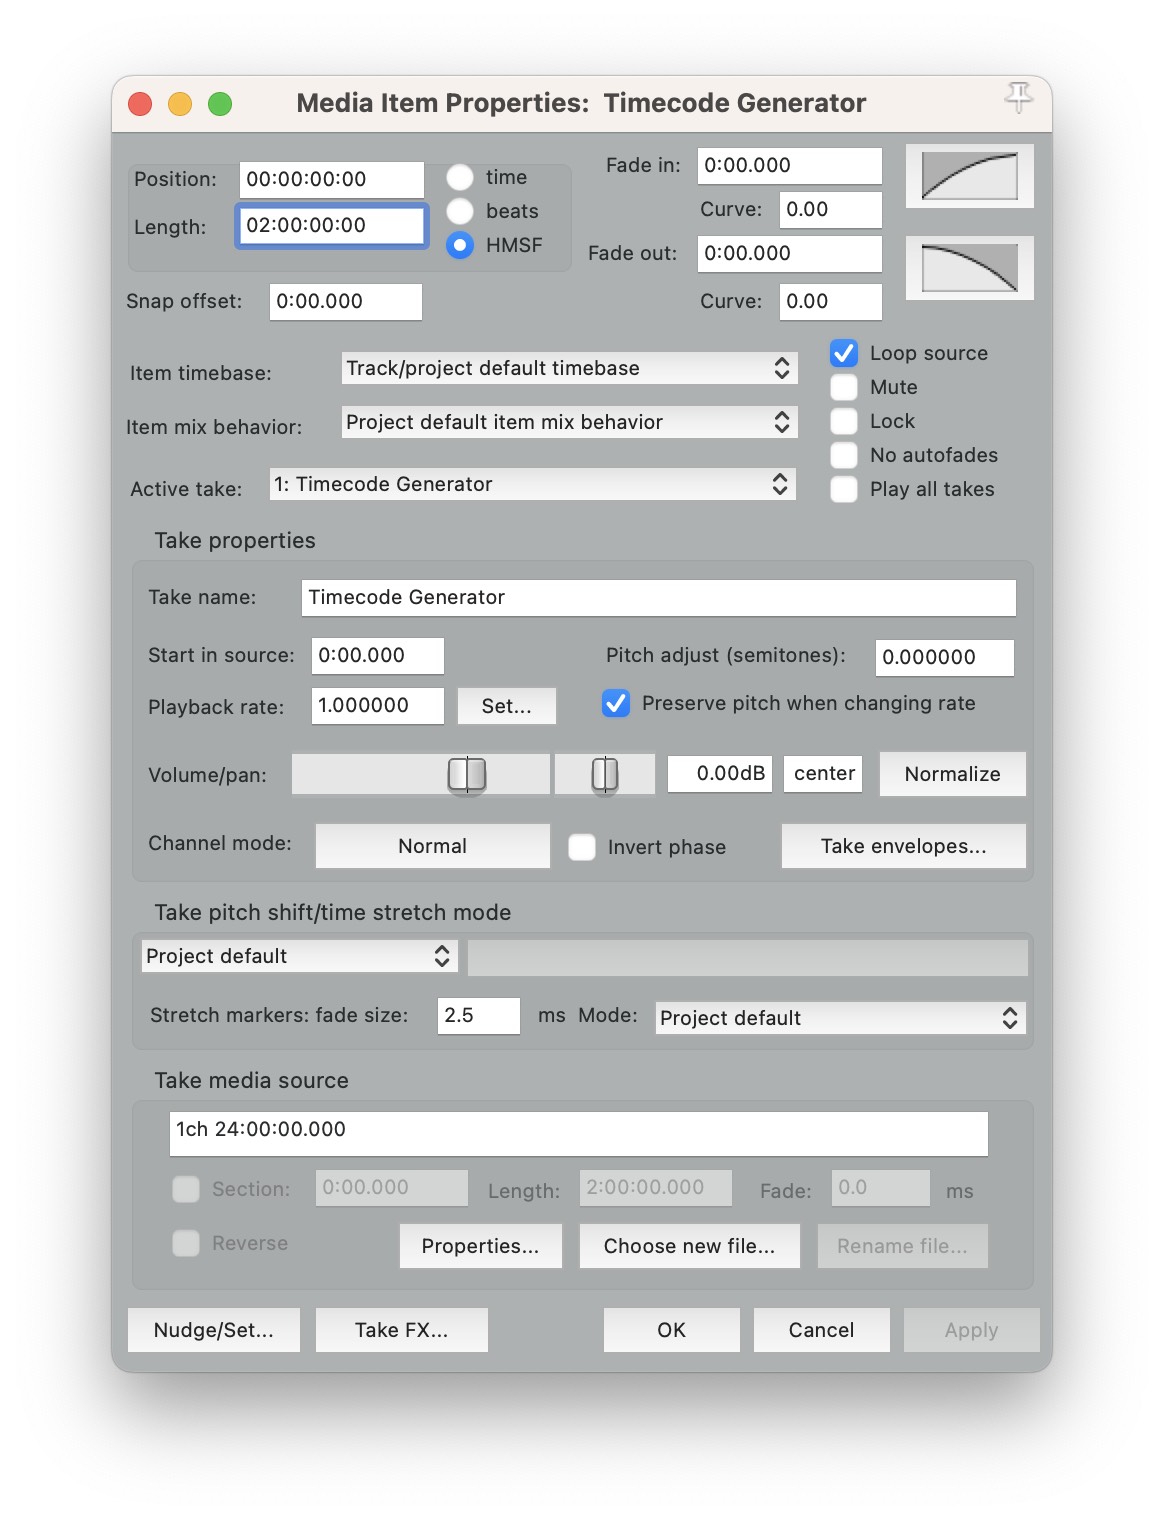
Click on the Properties button at the bottom of the window to show the SMPTE Generator Properties window.
Enable the Send MIDI (MTC) option.
Ensure that the Start Time field is set to the same value as the start of the REAPER Timeline.
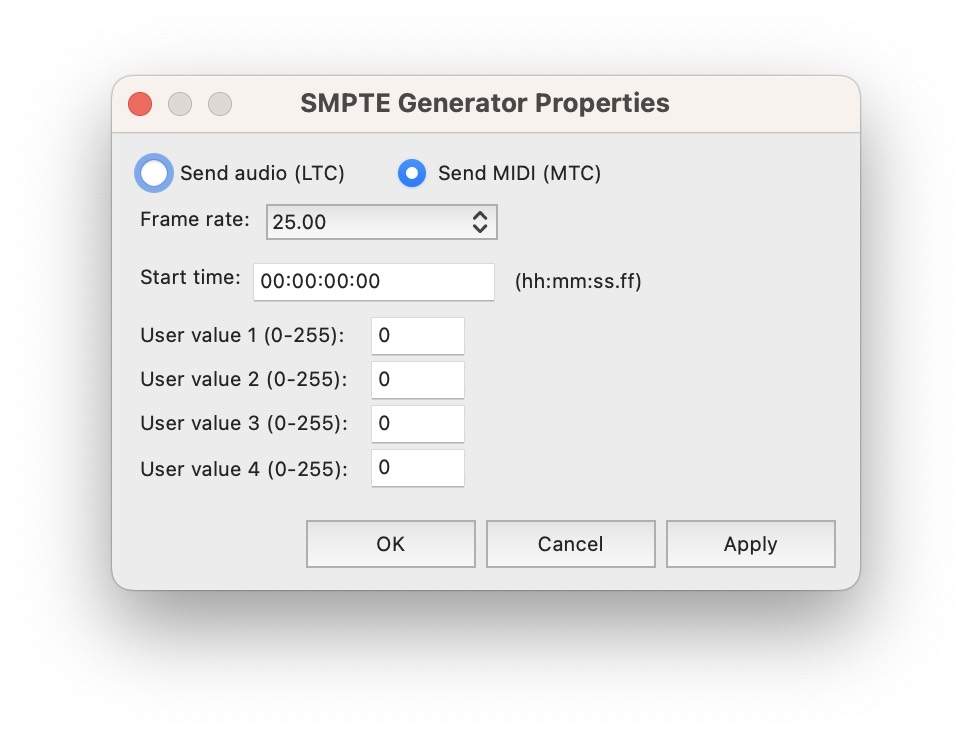
Click on the Apply button then the OK button to close the SMPTE Generator Properties window.
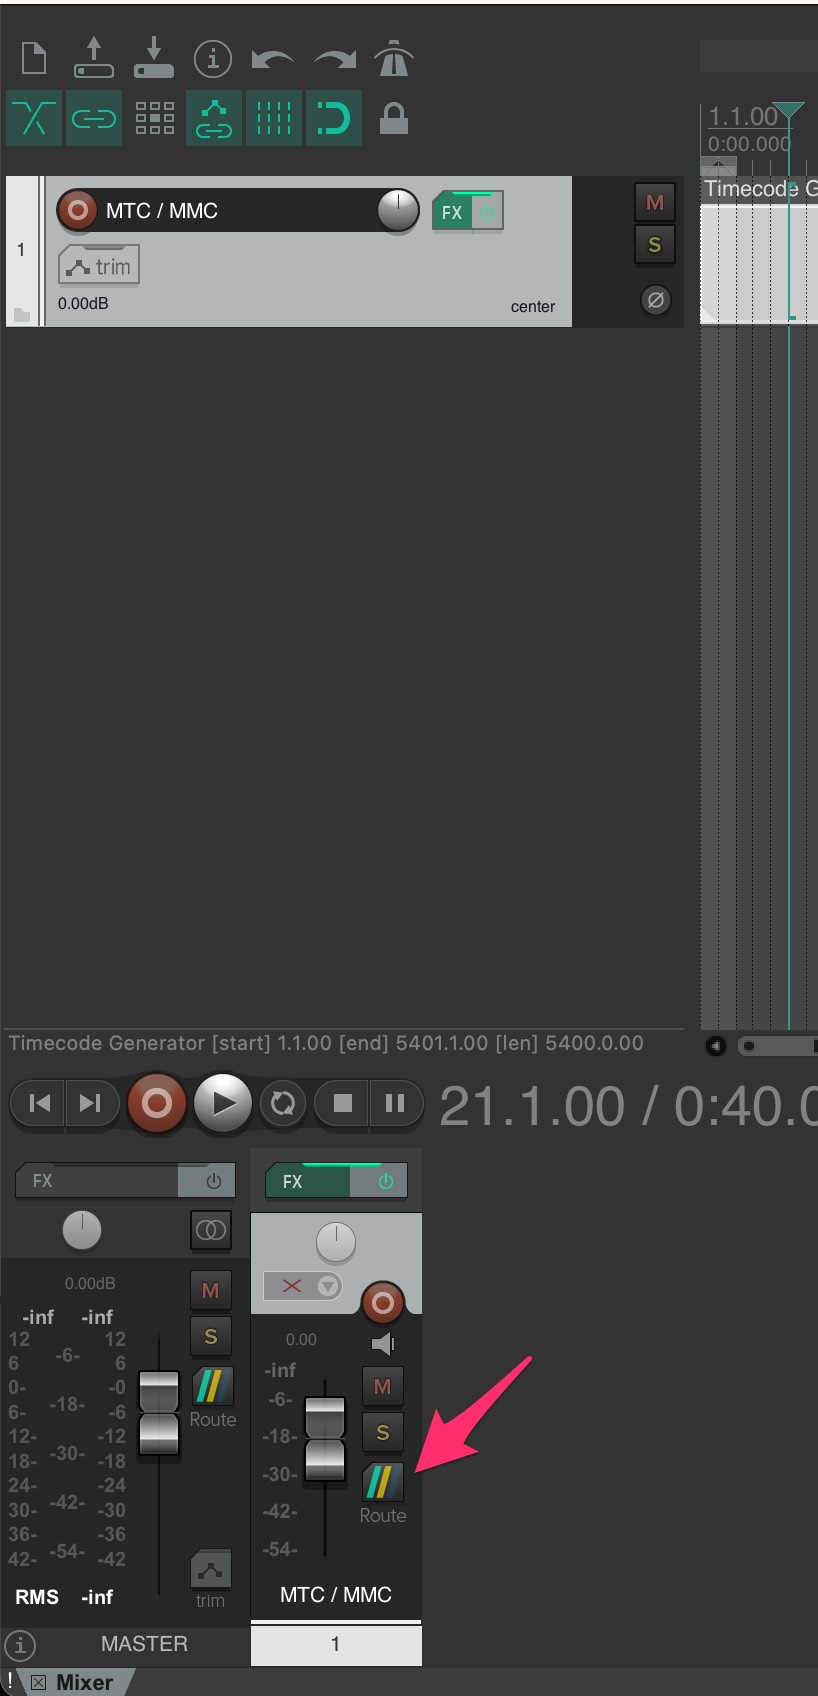
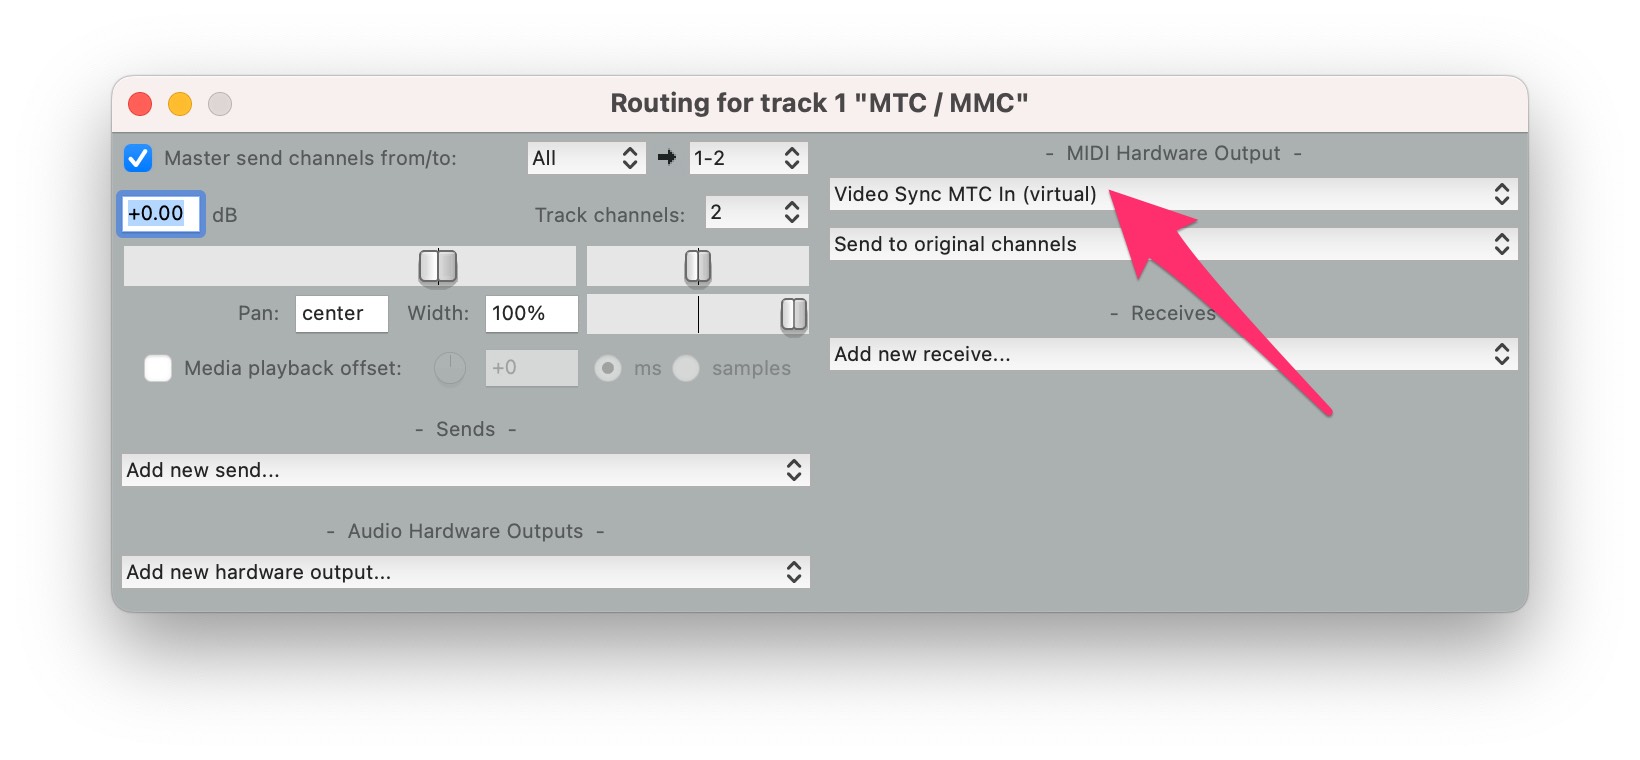
In the mixer at the bottom, click the Route button on the right of the corresponding fader with the track name chosen earlier to show the Routing for track (trackname) window.
Select Video Sync MTC In (Virtual) from the topmost MIDI Hardware Output field.
REAPER MMC (MIDI Machine Control) Setup
To enable MIDI Machine Control to be sent to Video Sync, open the REAPER Preferences window by clicking on the REAPER menu & selecting Preferences....
From the Audio sub-category list on the left, click on MIDI Devices.
Locate & double-click the Video Sync MMC In (virtual) entry in the MIDI outputs to make available list.
In the Configure MIDI Output window that appears, activate both Enable output to this device & Send clock to this device by clicking the tick boxes to the left of these options so that they turn blue.
Click on the OK button to close the Configure MIDI Output window.
Click on the Apply button then the OK button to close the REAPER Preferences window.
Currently, REAPER does not natively support MMC output. In order to overcome this limitation, download a copy of mrlimbic's free JS script plug-in: MMC Locate, by clicking this link - navigating to the Raw link to the top right of the page, holding down the Control button & selecting Download Linked File from the menu item.
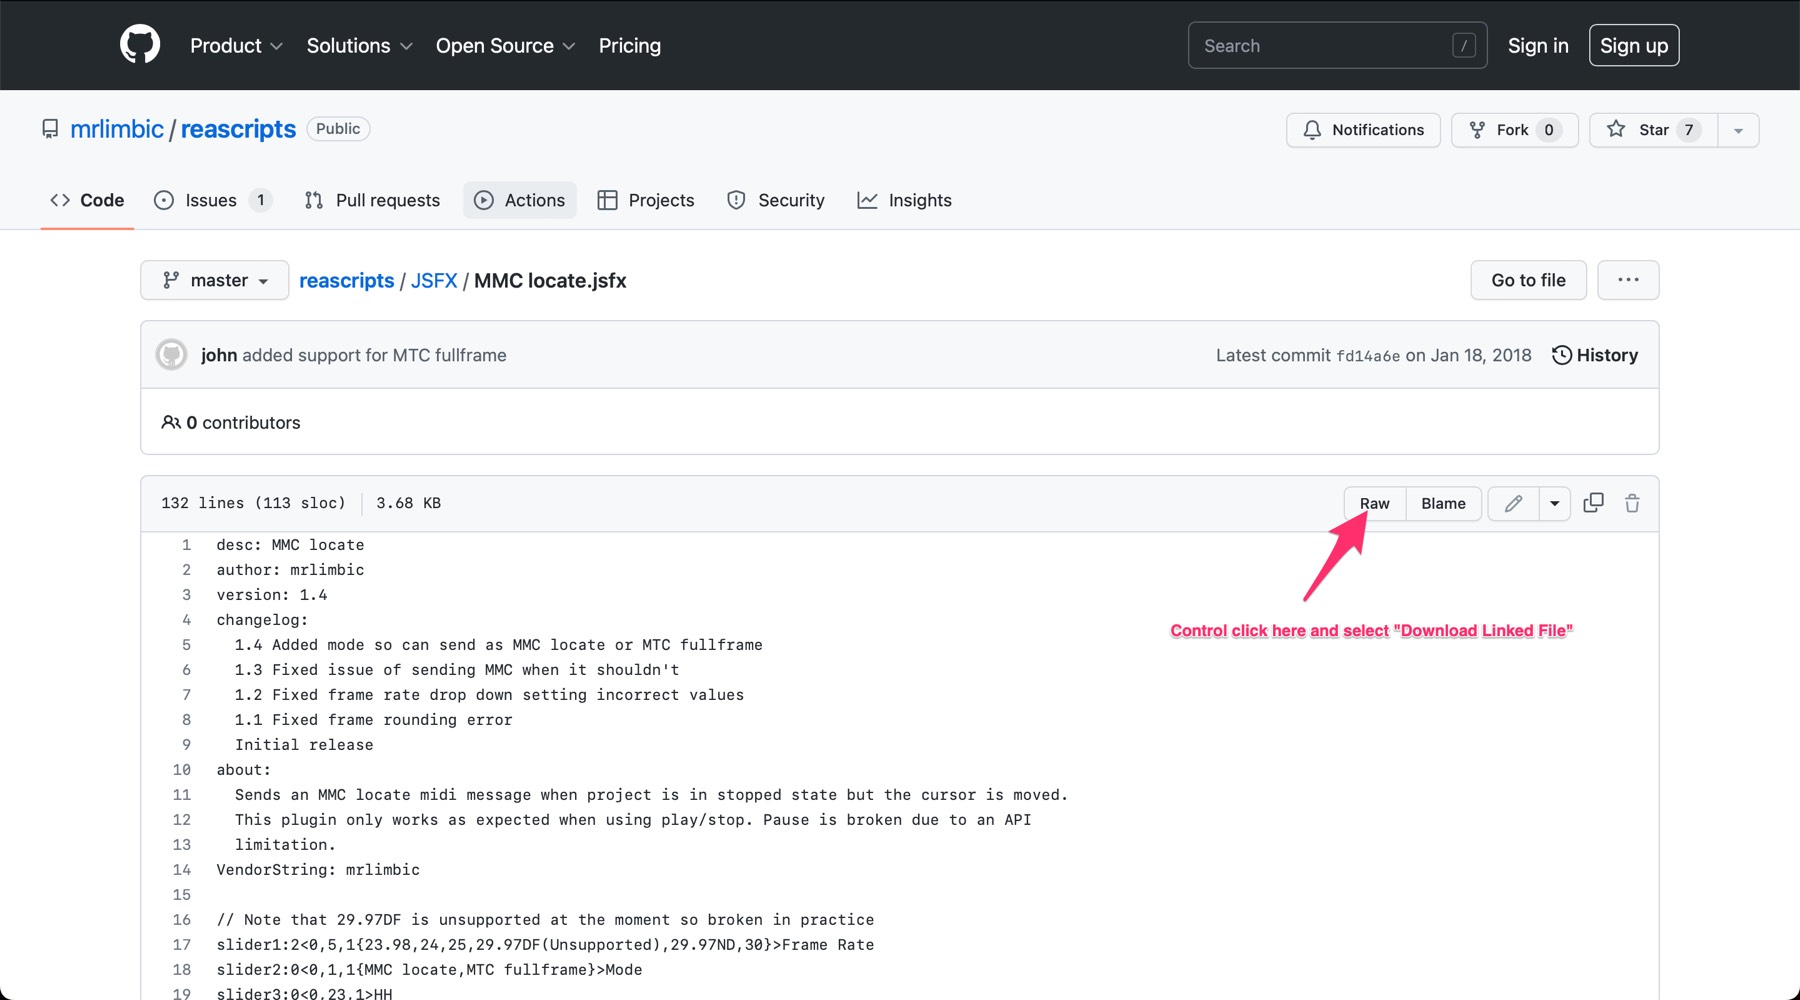
Note: Please ensure that the plug-in is downloaded exactly as outlined above. Failure to do so may download it in the wrong format (.txt or .HTML), which will corrupt the plug-in & cause the plug-in or UI not to load inside of REAPER.
Locate the downloaded file, called MMC locate.jsfx.txt in your Downloads folder & move it into the following folder:
(macOS drive)/Users/(your user name)/Library/Application Support/REAPER/Effects/utility
In REAPER, on the MTC track created earlier, click on the FX button to the right of the Track Name.
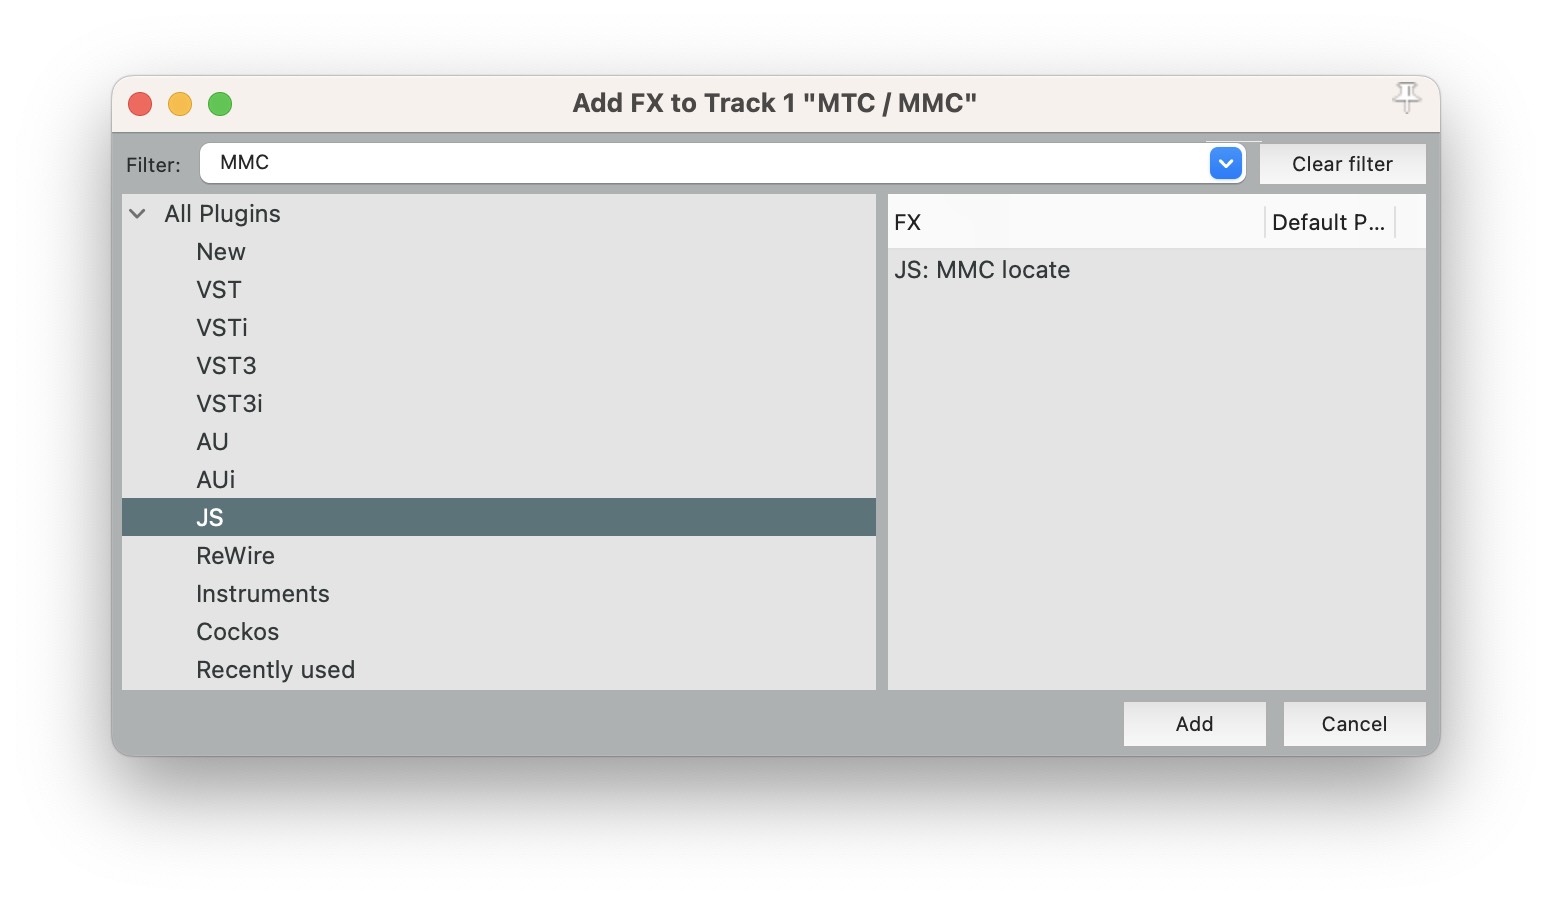
In the Add FX To Track window that appears, click the arrow to the left of the All Plugins window, to show the contents of that folder. Click on the JS folder. Click on the FX Menu item & select Scan for new plugins. Back in the Add FX To Track window, type MMC into the Filter: field. This will show the plug-in on the right hand side of the window. To add it the track, double-click it, or select it & click the Add button at the bottom of the window.
In the Frame Rate field of the MMC Locate plug-in window that appears, set the correct frame rate according to the Timeline frame rate in Video Sync.
Set the Mode field to MTC Fullframe.
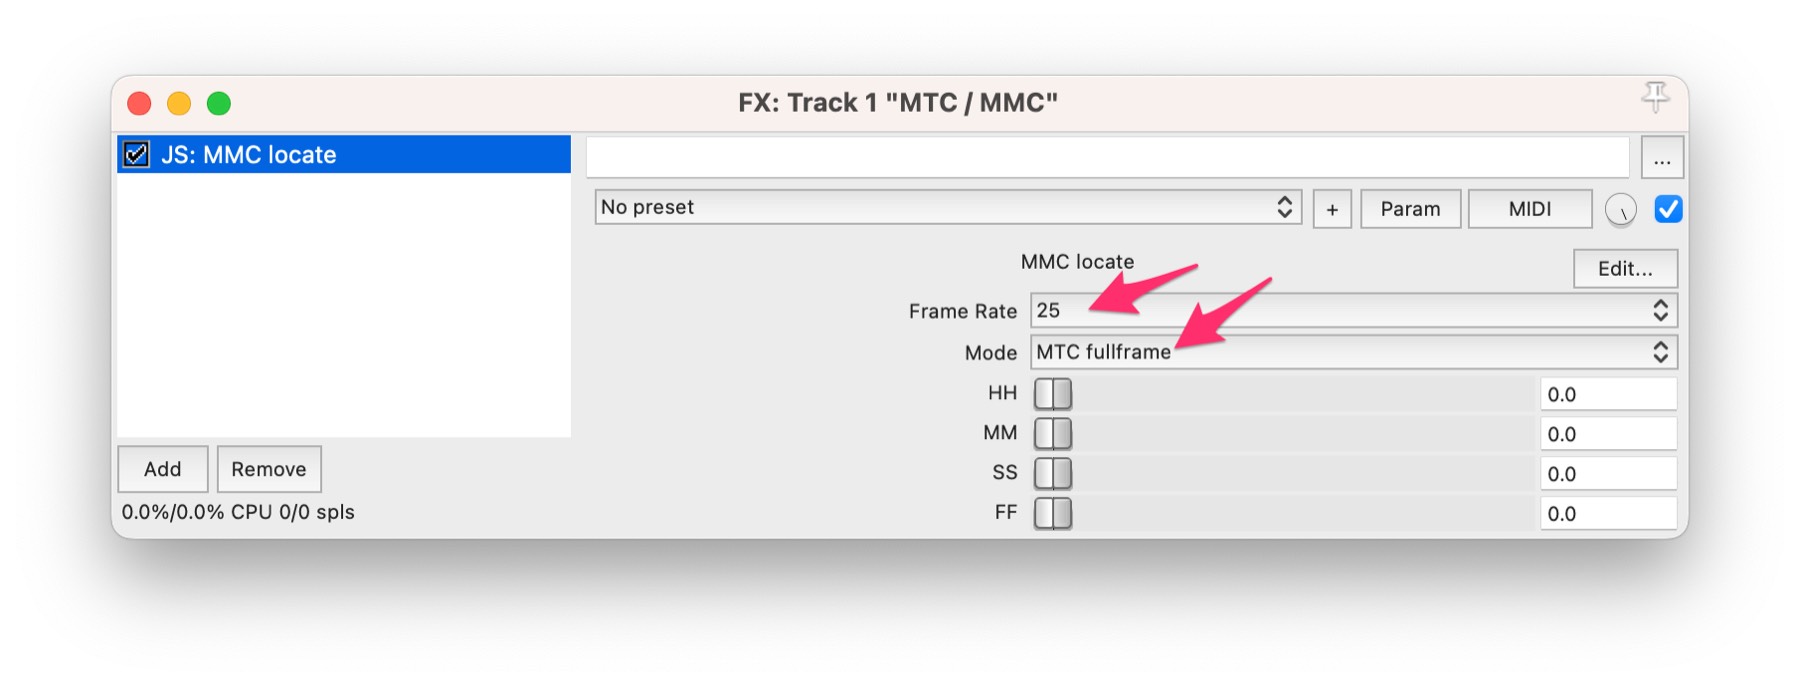
Close the plug-in window using the top right red window button.
On the corresponding track, click on the circular record arm button to the left of the track name.
Directly underneath the record button, set the Record mode field to Record: disable (input monitoring only).
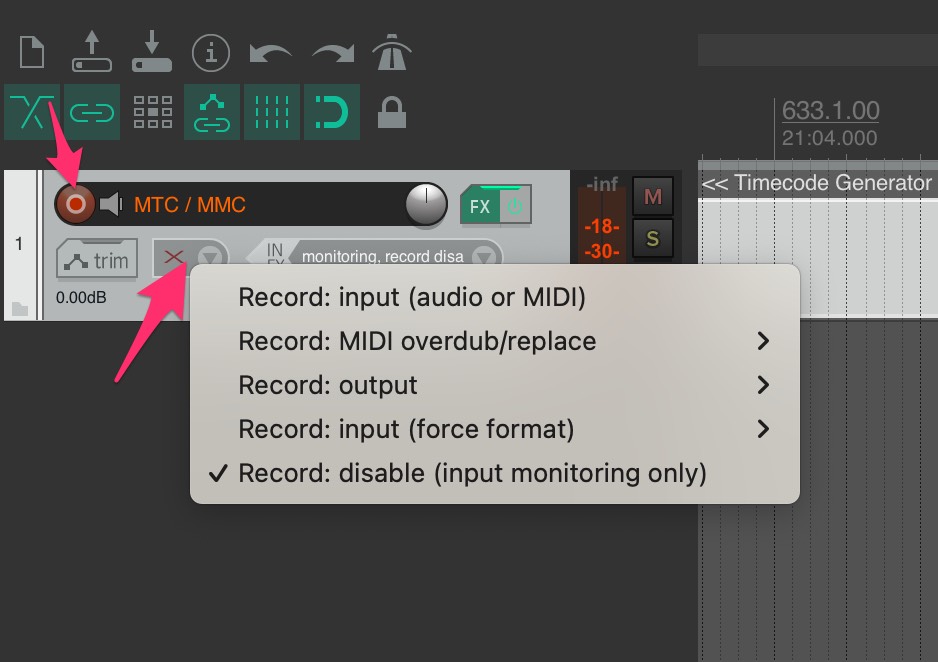
Please note that one limitation of using this plug-in, is that due to a JS API limitation, REAPER's Pause button is not recognised and hence the timecode counters will still increment as if still in playback. To overcome this, please consult the Cockos REAPER Forums and documentation to find out how to map the pause key to a custom action that seeks the Edit cursor, then stops.
Our thanks to mrlimbic for this invaluable tool.
Matching Frame Rates
For MTC sync to work correctly, the REAPER project frame rate must match the timeline frame rate in Video Sync.
In the TIMELINES tab, locate the active timeline and check its frame rate in the summary section. If video is present on the timeline, the frame rate is derived from the video file. If no video is present, the frame rate can be set manually by clicking the pencil icon next to the timeline name and selecting the required frame rate from the TC Frame Rate menu.
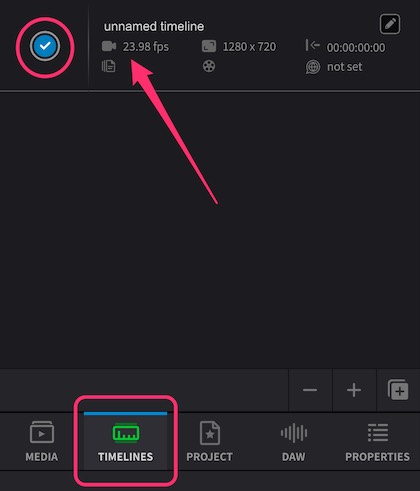
Ensure your REAPER project is set to the same frame rate as the Video Sync timeline.
Enabling Synchronised playback
When hitting play or scrubbing within REAPER, both the incoming timecode field should now be seen incrementing & the timecode rate displayed within the Incoming TC section to the left of the main timecode counter in Video Sync.
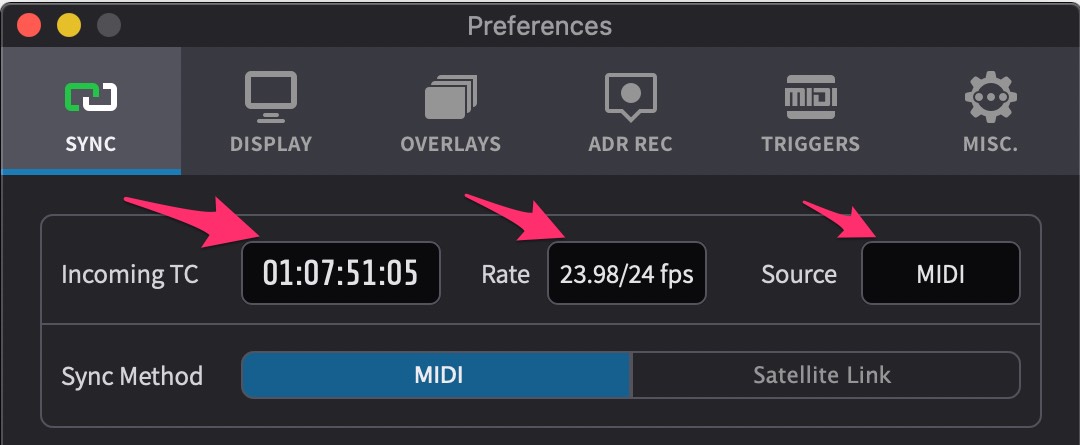
If the Sync button to the left of the transport buttons isn't already blue, click on it to activate it to follow external sync.
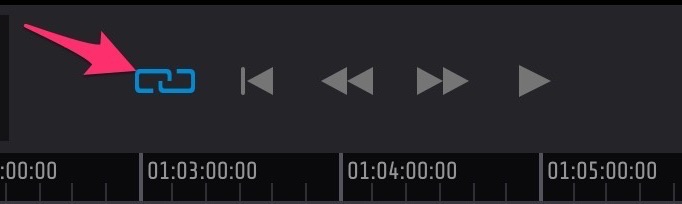
Video Sync MTC/MMC sync is now online & ready to go. Hit play in REAPER and Video Sync will play back in sync.
High Frame Rate Content
Video Sync supports timelines running at up to 60 frames per second. However, MTC was designed around SMPTE broadcast standards and only supports frame rates up to 30fps (24, 25, 29.97, and 30). The specification has never been updated to include higher frame rates.
To sync high frame rate timelines via MTC, set the REAPER project frame rate to half the timeline frame rate. For example:
- 48fps timeline → set REAPER to 24fps
- 50fps timeline → set REAPER to 25fps
- 60fps timeline → set REAPER to 30fps
Video Sync will automatically match the incoming timecode at half its frame rate.
Troubleshooting
If incoming timecode is not showing in Video Sync:
- Check that MTC generation is enabled in REAPER
- Check that the correct MTC port is selected in REAPER's synchronization/MIDI settings
- Ensure Video Sync was launched before REAPER so the virtual ports are available (if using virtual ports)
If incoming timecode is showing but playback is not syncing:
- Ensure the Sync button is enabled (blue) in Video Sync
- Check that frame rates match (see Matching Frame Rates above)
- Check that timecode ranges match - if the REAPER session starts at 01:00:00:00 but the Video Sync timeline starts at 10:00:00:00, playback will not begin until REAPER reaches 10:00:00:00
If Video Sync's position only updates during playback but not when navigating in REAPER:
- This indicates an issue with MMC (MIDI Machine Control) setup
- Check that the correct MMC port is selected in Video Sync
- Check that MMC is enabled and configured correctly in REAPER
If playback is jumpy or frames are being skipped:
- This is often caused by mismatched frame rates between REAPER and Video Sync - ensure both are set to the same frame rate (see Matching Frame Rates above)
- Try increasing the TC Freewheel value in Preferences → MISC. This defines a number of freewheel frames to keep playback running through unexpected timecode values. Note that higher values will make Video Sync less responsive to external timecode changes.
If synchronised playback still does not work after following these steps, please contact support@non-lethal-applications.com.